Use the Scheduling Assistant and Room Finder for meetings in Outlook
For additional information, see Use the Scheduling Assistant and Room Finder for meetings in Outlook on microsoft.com.
Usually you should book the room at the same time as you send invitations to the meeting. You can make a room reservation and send an invitation to the meeting in several ways. These instructions first cover a quick and simple way of creating a meeting invitation and booking a room for a specific room.
Please Note: Declined Room Reservations will not be removed from your calendar. You will receive an email with the status of your meeting room reservation. The room will also appear as a attendee in your meeting request.
Below you will find instructions for selecting an available room from all the available meeting rooms within Town Hall.
Finding a Room
Using Room Finder and Checking Room Availability (Quick Method)
- In a new meeting, add the Required attendees, the Start time and the End time, then click the Room Finder button
at the end of the Location field.
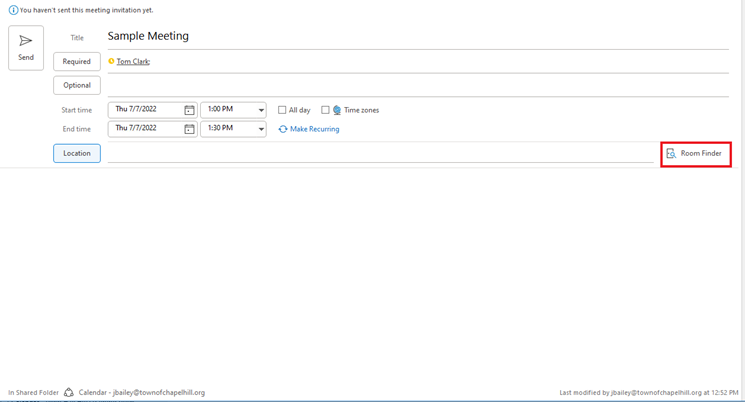
- You will find the Room Finder on the right of the new meeting. All the meeting rooms, along with their availability
and capacity will display under Conference rooms in Conference Rooms.

Find Room using Location and Scheduling Assistant (Method 2)
- Alternatively, if your Room Finder does not display results, you can click in the Location field
to open a new window Select Rooms: All Rooms double-click on the desired room below to add to the
Rooms field. Once the selected meeting room has been added to the list, select OK.

- If you choose this option, the next step is to determine if the room selected is available using the Scheduling Assistant .
Find Room by using Scheduling Assistant (Method 3)
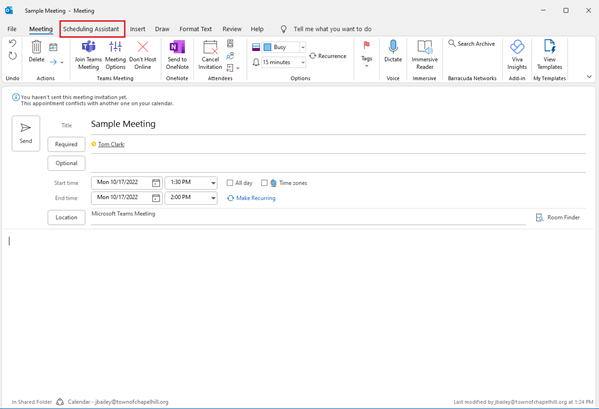
- Another way to schedule your meeting room is by going directly to the Scheduling Assistant. In
a new meeting, add the Required attendees, the Start
time and the End time, then click the Schedule Assistant button
located in your Outlook ribbon menu.
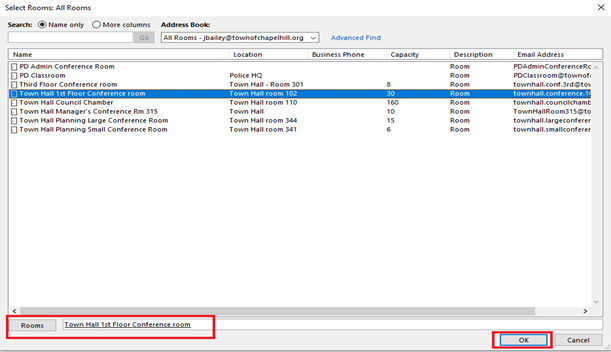
- Select Add Room
to open a new window Select Rooms: All Rooms double-click on the
desired room below to add to the Rooms field. Once the selected
meeting room has been added to the list, select OK.
- Once you are satisfied your meeting request is complete, click Send to schedule your meeting.
Scheduling Assistant
Scheduling Assistant to select availability
- If the meeting has multiple attendees and busy conference rooms, it can be difficult
to find a time that works for everyone.
To find availability for people and rooms, select the Scheduling Assistant button on the ribbon, choose the appropriate criteria and select a desired time where all desired people and room(s) are available OR chose AutoPick.

- You will be taken to another screen which displays the availability of all your meeting participants
and your selected room. Click on a blank time slot that shows everyone’s availability as free.

- After you find an appropriate time slot and add a conference room to the meeting, select Meeting on the ribbon. If open, you can then close the Room Finder. When you're done setting up your meeting, select Send.
How can I make sure that my room reservation was successful?
- The room has sent an accept response message (Accepted), and the meeting details have not been changed afterwards. Make sure that the reservation message comes from the room, as the attendees also send them.
- Open the room reservation calendar and check that your own reservation is there. The room reservation calendar is the only reliable way of checking who has valid reservations.
- If the meeting has been changed, remember to inform all attendees and the room of it (Send Update), and make sure that you receive and accept response messages.